Reeds
The world of double reeds can be an intimidating place to the non-double reed player. It seems like it would take a lifetime to fully understand how double reeds operate and master making and adjusting reeds. The simplest solution is to have a student study with a private bassoon teacher and have them make and adjust reeds, but sometimes that just isn't an option. Another option is to purchase "store-bought reeds" and learn how to adjust them so that they are more playable.
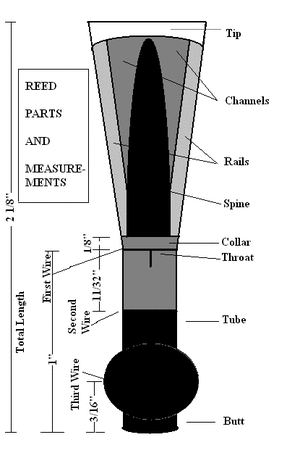
Parts of the Reed
|

|
The bassoon reed is itself a work of art. The journey from a blank piece of cane to a precisely manicured bassoon reed is a time intensive process that takes time and practice to learn and master. Each of the sections of the reed seen above are expertly shaped to thicknesses that are measured in millimeters.

What to look for when purchasing a reed:
When purchasing a reed there are two main options. The first is buying a Hand-made Reed from a local bassoonist or a music store that sells hand-made reeds. The only problem with these are they can be far more expensive, are less consistent in their construction from reed to reed, and are usually very player specific as far as the subtle shaping of the reed is concerned. The other option is to purchase machine-made reeds, which are less expensive, and tend to be consistently shaped from reed to reed. The drawback with a machine-made reed is they will always need some kind of adjustment. Before you make those adjustments, here are some things to look for when initially purchasing a reed to make sure you have something you can work with:
|
Tip Opening
Wires Butt End Opening Reed Strength Cracks and Chips |
Should be slightly open with the ends of the blade even with each other. Look for a reed that "smiles" at you. The center of the tip should be the widest part of the opening, and you should be able to gently pinch the tip closed between your fingers. The center should close last.
The wires should be slightly loose, but stay in place. Avoid wires you can move up and down the reed with your fingers. The 1st wire should have a more oval shape, and the 2nd wire should be more round. Needs to be completely round to form a tight seal with the bocal. Look for "medium" reeds. "Hard" reeds can be tricky to adjust, and "soft" reeds don't have enough cane to work with. Hold the reed up to a light to inspect for damage. A cracked or chipped reed won't work and should never be purchased. |
Tools you will need:
To properly adjust the reed you will need a proper set of tools. There are some very specific reed adjusting tool sets, as well as some hardware store options that will work just as well. Here is what you will need:
|
Mandrel
Reamer Small Pliers Plaque File Reed Knife Sand Paper Cutting Block |
Used to form the butt end of the reed and ensure a airtight seal with the bocal. Also used to securely hold the reed when adjusting.
Used to remove cane to open the butt end. Used to adjust the wires on the reed. Preferably with wire cutters. Flat piece of plastic that is slipped between the reed blades to allow for shaping one blade without damaging the other. A "heavy" guitar pick can also work. Used to remove cane when shaping the blades. A small, flat, metal file from any hardware store will work. Used to scrape material when shaping the blades. Can also be used to trip the tip of the reed. A standard utility knife found at a hardware store also works. Use 320 wet/dry sandpaper to make very fine adjustments to the blades. Used like a cutting board to add control and safety when cutting the tip of the reed. |
Guide to Reed Adjustments:
Think of the two blades of the reed like springs that must be the same strength and vibrate in the same manner to achieve resonance. From any point on the spine of the reed, the cane become thinner as you move toward the tip or the rails. Here is a list of common problems and possible fixes you can make by adjusting the reed:
|
Problem
High notes don't speak Overall Poor Response Poor Low Response Inflexible, hard to slur E's and C#'s dropping |
What may be wrong
Tip too closed Reed too thin Reed too thin Reed is too dry Poor balance Poor balance Tip is too thick Poor balance Reed is not sealing Reed is too stiff Too heavey on the back of the reed Poor balance Poor balance Poor balance Poor balance Mid section too thick Reed too thin or old Reed too thin or old Reed too thin or old |
Possible Solution
Squeeze sides of 1st wire to open the tip. It should be open the width of a dime. Squeeze sides of 2nd wire and adjust tip with the 1st wire. Clip the tip. Dip reed in water. Turn the reed upside down on the bocal. If the tip has a smile and the curved side is thicker than the flat side, scrape the thick side. Scrape the tip or use sandpaper. Check for and scrape thick spots. Round of the back of the reed with a mandrel. Flatten 2nd wire and adjust tip with the 1st wire. Scrape the back of the reed. Turn the reed upside down on the bocal. If the tip has a smile and the curved side is thicker than the flat side, play with the flat side down or scrape the thick side. Check for and scrape thick spots. Check for and scrape thick spots in the hinge area (alley near the tip). Scrape the hinge area (alley near the tip). Squeeze sides of 2nd wire and adjust tip with 1st wire. Clip the tip. Start that reed necklace you have always wanted. |

